Followers

Thursday, 29 December 2011

It's Just Inspirational's 9th Week Already

Good morning bloggers, I hope you are all fine and dandy today.
I cant believe that the Just Inspirational Challenge blog is in its 9th week already, it doesn't seem that long ago that we were all waiting nervously for the 1st challenge to go live, but it is week 9 and the inspirational photo for you this week is


isn't that just a fab photo to use as inspiration, all those gorgeous bright colours.
Our brilliant sponsor for this weeks challenge is


and here is my make

I have used just the cutest little dragonfly digi from the limited runs digi shop and coloured him in with pro markers. The spots on his wings I first coloured all lovely bright colours and then added either stickles, liquid pearls or a sparkly paint I have. I cut round him and edged the cut out in a light grey pro marker and mounted him of foam pads. I chose a small shaped card I had in my stash as I just wanted a sweet card to give to my friend and her family to thank them all for our wonderful Christmas presents. The sentiment I made on the computer and mounted on a piece of white card I coloured with pro marker to match the colour of Mr dragonfly's wings and added a tiny blob of lilac liquid pearls to either end. Finally I edged the whole card with a yellow chalk ink pad to add a bit more colour.
Its quite a clean and simple design but with all the bright colours and different elements used on the dragonfly I didn't want to over complicate things by using a backing paper.

I hope you like my card and that you will join in the super challenge this week at Just Inspirational.

Happy Crafting
Kate xxx

Wednesday, 21 December 2011

Christmas Card Box

Good evening bloggers, i hope you are all well. Everyone ready for the jolly bloke coming to bring our pressies ? i am just about, going to get the fresh veg and last minute bits on Friday morning after a trip to sirstampalot for their 12hr sale :0) and then going to see my cousins little boy have breakfast with Santa. He is 2 and a half and is really into it all this year, and its for him that i made this card come box. It started off as a card but because i had already made him a Christmas card i decided to make it into a box to contain a few Christmas chocolates for a little surprise, i think he will like it.

I started off by colouring the image with pro markers, added glitter glue to the Santa hat and ribbon on a couple of the presents, and silver gel pen to the baubles. This was then mounted onto blue linen effect paper, then onto gold card and finally onto a blue linen effect card. I added a red ribbon bow, little gold bell and blue gem to the top corner just to give it a bit of dimension.
then came the idea to turn it into a box, so i set about making the bottom of the box, and covered it inside with red and gold paper and outside with red paper covered in gold circles. the paper wasn't from a Christmas pack but i thought the colours went well with the colours i had used to colour the digi. I made the top of the box a teenie bit bigger so it would slip over the bottom box, decorated with the same circular paper and added a thick red canvas type ribbon round the box, covered the join at the front with a matching bow, bell and gem as is on the card. Then i stuck the card to the top of the box with some blu tak so it can be removed and a new one added next year in case Aston wants to keep the box and re-use it for his Santa treats every year.

I think that's probably going to be my last post before the big day as things start to get a bit busy here from now on in, so i will wish you all a very
MERRY CHRIMBO
and a
HAPPY NEW YEAR

Happy crafting my friends
Kate xxx

i would like to enter this into these challenges:


Tuesday, 20 December 2011

YAY Its My 1st Blogoversary

Happy 1st Blogoversary To Me :0)

and to celebrate, and because I forgot to do it before now, I am going to give away my 1st blog candy.
Here it is


I decided my blog candy would be lots of little bits that whoever wins will hopefully find useful. There's blank cards,a5 card & paper sheets, 8x8 backing papers, die cuts, pearls & flowers, glitter, toppers, vellum & card squares, doilies, pins, ribbon and a stencil. Lots of useful goodies I think.
I am going to run my candy for a month ending on 20th January at 10pm, so that we can all get Christmas and new year out the way, have a play with the crafting goodies Santa (hopefully) brings us and then the winner will have another pressie coming their way at the end of January.
My candy is open to all the followers of my blog, but I don't want you to follow just because of the candy but because you want to. Please post a piccy of my candy on your own blog somewhere, the sidebar is fine and leave me a comment below.
Once the date to enter had passed I shall write all the names of you who have commented on a piece of paper and get my hubby to draw one from the hat, or more likely the fruit bowl, and that person will win all the above goodies. For every 25 people who comment I shall add a smaller prize of some decorated pins that I shall make myself and can be used to add to your cards or scrapbook pages etc.

So lets have a recap,what do you have to do:
Post a piccy of my candy on your blog
Leave me a comment on this post
For every 25 people who comment I shall add further prizes of decorated pins and shall draw more winners to get those.

I think that's all i need to tell you. If I don't blog again before then I wish you all a lovely Christmas and a wonderful new year.
Happy Crafting
Kate xxx

Sunday, 18 December 2011

Cutie Pie Christmas Candy

Just found out that this lovely blog is offering some fabby christmas candy. Hop on over to http://cutiepiechallenge.blogspot.com/ and take a look at the brill candy
Christmas Candy!

Dont forget to make sure you follow the rules to be in with a chance of winning.

Kate xxx

Saturday, 17 December 2011

OMG!!!!

OMG!!!!!
I have just realised its my 1st blogoversary in 3 days time and I've not done my blog candy!!!!!
OK so here's what i am going to do, on my actual blogoversary i will upload my blog candy piccy and i will run it for 1 month to give everyone time to come and have a lookie and, fingers crossed, want to enter for a chance to win it. Then once all the new Christmas pressies we are getting have been played with someone will be getting another pressie in the form of my blog candy towards the end of January time, how does that sound :0)

So come back in 3 days to see my blog candy and enter if you wish for a chance to win

Kate xxx


Thursday, 15 December 2011

SUPER-DE-DUPER WEEK 7 CHALLENGE

Good Morning Bloggers

WOW what a brilliant challenge we have for you this time at Just Inspirational. As its so close to Christmas we are making this a 2 week challenge so you can all take you time and maybe enter more than one card, and believe me when you see whats on offer you will want to enter as many times as you can.

So your inspirational photo this time is


I so cant wait for my Christmas dinner, yummy yummy.

OK so here goes, we have not 1 not 2 but 3 sponsors this week!!!!!
Imagine winning 3 lots of crafting goodies, what a brilliant prize.

This challenge we are very happy to be sponsored by


who is giving a winner £10 to spend in her store


who will give the winner some digi's from the store

and


who will give the winner 3 digi stamps.

OK here is my card, made using a super digi from Stampin Dragon


The digi is coloured with pro markers and the Christmas lights i used papermania metallic pens and gold and silver stickles glitter glue over the top. This was then matted onto plain red card stock. I used a piece of paper from my stash and as this was my sons Christmas card i wanted to keep it masculine colours and the brown and green tied in great with the inspirational photo. For the sentiment i used a little stamp set i got years ago for the £shop and stamped the letters using memento inks in brown, red and green, then cut each letter separate and layered them together in wonky lines, i think its a bit more teenager-ish than a normal, straight gold or silver greeting.

I hope you will all join in our fantastic challenge this time.

Thanks for looking and happy crafting
Kate xxx

Wednesday, 14 December 2011

Chilly Christmas

Hello fellow bloggers, i hope you are all keeping warm and crafting happily. Are you all ready for Christmas yet? I'm not and i don't like being not ready lol
Ive only just got around to making my family Christmas cards and this is the one i made for my darling hubby Steve

I made the whole card, except the silver snowflake and pink gem, using goodies from a Craftwork Cards goodybag i managed to buy for £5 when they had a deal on a few weeks ago. The die cut images are simply adorable and i chose the penguin and bear holding a heart and mistletoe, coloured with pro markers and glittered with clear glitter glue and added snowy glitter to the falling snowflakes. I cut a matt of the green paper slightly bigger than the die cut image and stuck the image onto this, covered a card with the blue & sliver embossed paper. Stuck the image matt into the bottom corner of the card and added a die cut 'christmas kisses' sentiment, stuck onto a die cut tag, to the top corner. I wanted to add a little bling as it was for my hubby i didn't want to make it too girly so i added a plastic silver snowflake i found in my stash and used a pink gem to tie in with the pink heart the penguin is holding.
Hubby liked it, thankfully.

Thank you for looking and happy crafting
Kate xxx

I would like to enter this into these challenges:


Thursday, 8 December 2011

Week 6 at Just Inspirational Challenges

Hi Bloggers

OOOOOOOO its nearly Christmas, are you all excited? I am :0) apart from the fact that I've just discovered my camera is broken, not good at all.
Anyway lets get onto week 6 at Just Inspirational , the inspirational photo this week is
 isn't that a scrummy looking gingerbread house, I love gingerbread things and my Christmas tree is decorated with lots and lots of different gingerbread people this year.
We are sponsored this week by


Robyn's Fetish Digital Stamps And More, a division of I Did It Creations, was created and is owned by Robyn Weinrib. Robyn offers a wonderful variety of digital stamps and digital papers, designed to meet the needs of all digital paper crafting addicts for every occasion.
and the winner will get 5 digi's from the lovely Robyn.
Here's my creation using one of the fab digi's from Robyn's Fetish Digital Stamps


isn't that gingerbread baby girl soooooo sweet, I love her. I used colours from the sweets the decorate the gingerbread house and the baubles on the tree in the inspirational photo. The digi is coloured with promarkers and for the icing I used glitter glue and made it extra glittery with white puffy glitter. The backing paper was from my stash, ribbon from Lidl, a great buy at 3 rolls for 99p, and the sentiment I made myself. If you would like to use my sentiment on your makes this week, please feel free to grab it below but please if you use it mention where you got it from, thanks.

So what are you waiting for, get your crafty fingers working and enter our week 6 challenge to be in with a chance of winning some great digi's

Kate xxx

I would like to enter this into the following challenges:
http://abcchristmaschallenge.blogspot.com/2011/12/y-is-for-yipeee-christmas-is-almost.html
http://digistamps4joy.blogspot.com/2011/11/ds4j-challenge-33-merry-christmas-but.html
http://divasbydesignchallenge.blogspot.com/2011/11/challenge-16-anything-goes.html
http://freshbreweddesigns.blogspot.com/2011/12/fbc-76-month-long-prize-challenge.html
http://inkyimpressionschallenges.blogspot.com/2011/12/winner-iic34-and-iic-36-challengeuse.html
http://pennyschallenges.blogspot.com/2011/12/challenge-68.html
http://www.whimsical-designs.com/2011/12/winter-fun-whimsical-designs-challenge.html
http://creativecardcrew.blogspot.com/2011/12/tis-season.html
http://promarkerchallenge.blogspot.com/2011/12/week-129mega-christmas-challenge.html

Thursday, 24 November 2011

Just Inspirational's 4th Weekly Challenge

Hello again Bloggers
brrrrrrrrrrrrrr isn't it getting chilly now, its definitely nearly hat, scarf and mittens time, which means it must nearly be Christmas :0)

So its week 4 at Just Inspirational Challenges already, my isnt the time going fast, and our sponsor this week is


and the inspirational photo is


YAY i love snow, and sooooooooooo hope we get some this christmas. Well i had better show you my make for this week


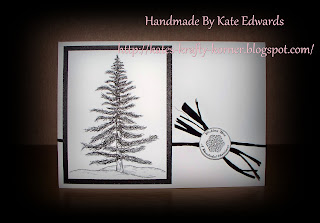
I used the gorgeous pine tree digi, matted it onto black card and added super sparkley clear stickles, as my snow, to the branches and along the lines of the ground. I wanted to keep this card quite simple sodecided to use some black raffia across the card and tied to the side of the digi image. i added a couple more smaller pieces of raffia tied over the top of the knot so there were more lose pieces. on top of the knot i stuck a circle sentiment i made on the computer, stuck down with foam pads.

I hope you like it and that you will join us in our challenge this week, and be in with a chance of wining digi's from Shelly's Images.

Kate xxx

I would like to enter this into the following challenges:

http://creativecardcrew.blogspot.com/2011/11/monochromatic.html
http://creativecraftchallenges2.blogspot.com/2011/11/free-for-all.html
http://digitaltuesdaychallenge.blogspot.com/2011/11/challenge138-sparkle-and-shine.html
http://everybody-art-challenge.blogspot.com/2011/11/169-christmas-card.html
http://paperandsuchonline.blogspot.com/2011/11/time-for-another-challenge.html
http://partytimetuesdays.blogspot.com/2011/11/ptt43-snow-us-what-you-got.html
http://shoppingourstash.blogspot.com/2011/11/shopping-our-stash-challenge-27.html
http://kaboodledoodles.blogspot.com/2011/11/challenge-94-baby-its-cold-outside.html
http://cutedaisymay.blogspot.com/2011/11/christmas-blog-hop.html


Thursday, 17 November 2011

Just Inspirational Challenges Week 3

Good Morning Bloggers


I hope you are all well and enjoying getting all your crafty bits done for Christmas, I know I am busy making cards and gift boxes at the moment.
So its week 3 at Just Inspirational already and this week we are sponsored by Crafty Sentiments Designs and this is the inspirational photo for this weeks challenge


Isn't it cute :0)  and here's my project for this week


I just love this digi, mummy snow making sure kiddy snow is all wrapped up lol
I decided to go with the colours of brown and pink from the photo, love that colour combo. I printed out the digi and just used 2 shades of each colour pro marker to keep it nice and simple, and used clear glitter glue for the snowflakes and the snow covered ground. the pink snowflake backing paper was from my stash and I made glittery swirls using the clear glitter glue as well. I love big bows at the moment and used some quite thick white satin ribbon to make a big bow and strip vertically down the card. I finished off the card with pink and brown card candi in the corners.
I hope you will come along and join in our challenge this week and be in with a chance of winning not only a great prize from out sponsor but we also pick a top 3 to get a blog badge too.


Happy Crafting
Kate xxx


I would like to enter this into the following challenges:


 http://digitaltuesdaychallenge.blogspot.com/2011/11/challenge137-christmas-time.html
http://sweetstampsblog.blogspot.com/2011/11/sweet-stamps-challenge-41-non.html

Friday, 11 November 2011

Just Inspirational Week 2

Hiya Bloggers

1st i have to apologise for my post being a day late, sorry, but better late than never as the saying goes.
So its Week 2 challenge at Just Inspirational Challenge Blog and this week we are sponsored by the brilliant Meljens Designs so if you enter you are in with a chance of winning 4 of their great digi stamps :0)
With it being remembrance day today the inspirational photo for this weeks challenge is


I think a lot of us are guilty of not remembering all those men and women who have given their lives so we can live the lives we do today, and i for one am very grateful and thankful, i just hope and pray there is never a need for so many to die in wars ever again.
So onto my creation for this week. I decided i wanted to make something other than a card, as if i made a card it would sit in a box and i wanted to make something i could have out on display in my craft room for this time of year, and made this instead

The Meljens image is coloured with pro markers and i cut it out with a nestie, i cut a larger shape from thick red card and before mounting the smaller card onto it i secured some 10mm black satin ribbon onto the red card to create the hanging loop at the top and crossed the ribbon over at the bottom and let a good length hang below, then stuck the image on top using a strong dst.This is now hanging on my craft room wall.
I do hope you will all come over and join our challenge this week, and i look forward to seeing your fab creations.

Kate xxx

I would like to enter this into the following challenges:
http://craftyribbonschallenge.blogspot.com/2011/11/challenge-6.html
http://cutecardthursday.blogspot.com/2011/11/challenge-190-reds-for-rememberance.html
http://celebratetheoccasion.blogspot.com/2011/11/challenge-38.html
http://digitaltuesdaychallenge.blogspot.com/2011/11/challenge-136-anything-goes.html

Thursday, 3 November 2011

Ready....Steady......GO GO GO

         *****Just Inspirational Challenge Blog*****

                  1st challenge now up and running

Hi fellow bloggers, thought i would make a little announcement about the fact the 1st challenge on Just Inspirational started at 9am today, and our 1st challenge is being sponsored by the fantastic Bugaboo Stamps.

OK so what is the 1st challenge? Its a photo inspiration challenge and the photo for this weeks challenge is perfect for this time of year

I decided to try my hand at a male card as i always leave these till the last minute because i find them so hard to do, well not this time with the fab Gus digi from Bugaboo and the gorgeous colours on that photo
So Gus was coloured with promarkers and out with a nestie, as was the great sentiment and the darker orange paper matts behind Gus and the sentiment. Then i used a lighter orange shaded paper to cover the card with, both papers were from my stash so unfortunately i cant remember what make they are. I always struggle with embellies on male cards beacuse i cant use flowers and glitter can i !!! So to stop the corner looking bare i used 3 different sized brown buttons and threaded them with blue twine to match the sky colour in the photo.

If you would like to take part in our very 1st challenge and be in with a chance of winning some Bugaboo images then please hop over to the challenge blog here and get creating.

Kate xxx

Tuesday, 25 October 2011

And Another One

I'm back again blogging friend with another card and matching box, I loved making the 1st one and decided to do a proper girly Christmas one this time.


Again I made the whole lot from scratch, including the card, which is 5.5" square and made from thick white papermill card, as is the box. The papers are fro my stash, but I seem to think they are from a Kate Knight pad that came as a freebie with a magazine, I love the pink and turquoise combo. 
Tilda was coloured with pro markers and I added stickles to the fur on her coat. the snowflake was stamped with a dew drop chalk ink pad in turquoise, and then stickles over the top.
I chose to use thin white satin ribbon to hang the 3 Christmas charms from instead of chain as I wanted this to be luxurious, and added a thicker turquoise ribbon to the white to make stripes across the snowflake paper.Its not very visable in the photo but down the right hand side of the snowflake paper, level with Tilda, I stamped the greeting 'have yourself a merry little Christmas' in memento London Fog ink, as I didnt want it to stand out but to be more of a shadow. i finished the card off with 3 bits of card candi.
The box I decorated with a thin strip of the pink paper and turquoise ribbon over the top, stuck diagonally across the top corner and a turquoise stamped snowflake in the opposite bottom corner.


I am very happy with this and its just how I wanted it to be.


Kate xxx


I would like to enter this into these challeges:


http://promarkerchallenge.blogspot.com/2011/10/week-123-theme.html


http://diecutdreams.blogspot.com/2011/10/challenge-101-so-charming.html

http://ooh-la-la-creationschallenges.blogspot.com/2011/10/challenge-91.html

http://letsinkitup.blogspot.com/2011/10/challenge-16.html

http://panpasteluk.blogspot.com/2011/10/panpastel-uk-challenge-blog-challenge-5.html

http://thesquirrelandthefox.blogspot.com/2011/10/challenge-3-one-for-girls.html

http://littleclairesdesigns.blogspot.com/2011/10/little-claire-monthly-challenge-14.html

http://squigglestamps.blogspot.com/2011/10/squiggle-stamps-christmas-cheer.html

http://christmasstampin.blogspot.com/2011/10/spar-ka-layand-winner.html

http://crafts4eternity.blogspot.com/2011/10/r42-embellishment-recipe.html


Wednesday, 19 October 2011

My 1st Ever Card & Matching Box, Made From Scratch

Hiya blogging friends, I'm back messing with crafty things again and I've started making bigger projects and doing lots of different thing, and most of all enjoying it all again. So what have I made recently, well I got me a simply sassy stamp and I LOVE her, so I will have to get me more I thinks.


I decided even before I started this card that I was going to do it all from scratch, even the card base, which is what I did. I also made this totally different from my usual way of doing things, in that I chose the papers 1st before I coloured the stamp in, why didn't I do it that way to start with!!! its so much easier. So papers chosen, I coloured this little sweetie in with my promarkers (i only need 13 more to have the full set) and i think i am getting better with my blending, then i set about deciding where i wanted to place everything. Going for something different again, i decided the flowers would go on the right instead of my usual top left corner, so picked flowers in matching colours, and used an assortment of card candi,brads and flat backed pearls as my flower centres. I didn't have exactly the right shade of pink to make my matting layers from so I used plain white card and just coloured the edges with my promaker to match the darkest pink colour I had used on the image. The sentiment is a LOTV and was stamped with memento ink onto white card but it looked too bright, so I coloured it a pale yellow with promarkers. I thought the top left corner looked a little bare with just the sentiment so made a decorated pin with different sized beads all in a pinky colour.
So that's the card finished, now i wanted to make a box for it to go in, and here it is


Ok so its not blow you head off OTT decorated or anything but I made it and I am very proud of it. I brought myself a box maker board and an envelope maker board, so decided i had better start using them. It was so easy i dont know what i was worried about. I used the same think white card that i used as my card base, made the top and the bottom and then set about decorating the top. I used the spare piece of the more detailed backing paper, matted it onto white card I had again coloured the edge to match and found a large pale yellow fabric flower, stuck it in the centre of the lid and punched a little circle from the backing paper to make the flower centre.
Well what do you think? Im very happy with it and cant wait to use it for someone specials birthday.


Thats all from me for tonight, but I will be around in blogland much more from now on,


Kate xxx


I would like to enter this into these challenges:
http://sweetstampsblog.blogspot.com/2011/10/sweet-stamps-challenge-37-lots-of.html


http://heartsonginspirations.blogspot.com/2011/10/challenge-20-use-flowers-andor-felt.html

http://pollycraftchallengeblog.blogspot.com/2011/10/challenge-115-girls-girls-girls-cazza.html

http://letsinkitup.blogspot.com/2011/10/challenge-16.html

http://stamptacularsundaychallenge.blogspot.com/2011/10/challenge-134-you-choose.html

http://thesquirrelandthefox.blogspot.com/2011/10/challenge-3-one-for-girls.html

http://iftheshoefitsscrapit.blogspot.com/2011/10/ff93where-my-girls-at.html


Monday, 17 October 2011

I'm Back With Fabby News

Hello all my blog-world pals, I know its been ages since I blogged but all that is going to change from now on. I have recently become a DT member for a fantastic new challenge blog thats starting very soon, and as a huge welcome to all the followers the blog has super-de-duper candy on offer :0)
If you want to be in with a chance to winning the candy, then pop over to http://justinspirationalchallenges.blogspot.com/2011/10/candy.html
and check it out, its brill.

Ok so happy excited me had better get on with my craftyness so I have some new things to share with you.

Happy Crafting & Keep Blogging
Kate xxx

Thursday, 22 September 2011

Ive Been Playing

Hi fellow bloggers

Ive been absent for a while again, and I'm sorry, but i do have some new makes to share with you all. I had a lot of wooden backed stamps that were taking up way too much space, so i decided to take the stamps from the wooden blocks and store them that way, brilliant. But i was left with lots of wooden blocks and wondered if there was something i could do with them. Then i came up with the idea of making paperweights and taadaaa the following happened


I started off by sanding the wooden blocks and making sure no of the sticky residue or ink was left on them, then i painted them in variuos colours of emulsion paint and waited for it to dry. Next came a coat of pva glue with a few drops of water added, and when this was almost dry a coat of different coloured emulsion paint, and wait...............Super-De-Duper cheap crackle glaze :0)
I then decorated the blocks with flowers, dewdrops, mini pegs, split rings, feathers, ribbon, card candi etc whatever took my fancy and made them look good.
On the underside of the blocks i eiher stuck a piece of magnetic sheet so they can be used to stick notes on the fridge etc, or i added washers, screws, metal weights to give some weight and little 'legs' so they can be used as paperweights on a desk.
I am very happy with my new makes and at the moment in am so enjoying having a time away from cards and delving into other craft makes.

I am also in the process of gathering goodies to add my very 1st blog candy, this should of happened arounf my birthday at the end of july, but due to bad health ive not been around in blogland much, this will be rectified and blog candy will be here very soon.

Take Care my blogging friends
Kate xxx

Wednesday, 31 August 2011

So Sorry For Not Being Here

Hi folks
I am so sorry I've not been in blog land for ages, I've not been around much since my stay in hospital and have only just started crafting again.
I'm keeping this short as i have some piccys to show you of some of my makes since i last blogged.

thank you all for your support and nice comments on my blog :0)

Kate xxx


Monday, 27 June 2011

ROARRRRRRRRRRRRR !!!

Its monday so that means another challenge at Stamp'n'Doodle and this time its Animals and/or Nature.
Being on the design team we were given this fab Lion image and asked to play with it, heres my card

I highlighted some areas of the image with coloured pencils, tore round the edges and inked with a brown ink pad to give it a distressed look. I founf the backing paper in my ever growing stash of random pieces of paper and thought the colours matched rather well. I then used some plain raffia and brown skeleton leaves for a toch of texture behing the image, which i mounted onto the card with foam pads.
I hope you will come along and join us with our challenge which goes live at 1pm Uk time today :D

Kate xxx

Friday, 24 June 2011

Olivia & Her Teddy

Hi folks,
I am gradually getting back into card making and blogging an thought i would share a card i made over 3 days last week with you.
The gorgeous little girl is called Olivia and she is from the Crafters Companion 'Patchwork Polly' range. i coloured her and her teddy in with pro markers. The rose backing paper is from a stack that was a magazine freebie, and i used 2 of the patchwork stamps on a plain green card and a checked blue card and stuck them in opposite corners of the card. To add a bit more texture to the card i used a doily underneath 7 assorted roses in soft blue-green and peachy-pink colours. i also used some peach coloured raffia instead of ribbon. Finally Olivia and ted were mounted onto the card using foam pads.
Even though this took me hours to do, spread over 3 days, i am very pleased with how it turned out and happy i was able to sit and make it, i enjoyed it.

Kate xxx

I would like to enter this into these challenges:

http://southerngirlschallenge.blogspot.com/2011/06/challenge-21-anything-goes.html

http://craftsandmechallenges.blogspot.com/2011/06/we-are-in-stitches.html

http://ilovepromarkers.blogspot.com/2011/06/challenge-71-anything-goes.html

http://rubysrainbow.blogspot.com/2011/06/c6-flowers.html

http://scrapbooksisters.blogspot.com/2011/06/card-challenge-no-41.html

http://deepoceanchallengeblog.blogspot.com/2011/06/deep-ocean-challenge-2.html

http://hookedoncraftchallenges.blogspot.com/2011/06/challenge-1-and-design-team-call_13.html

http://creativeinspirationschallenge.blogspot.com/2011/06/challenge-62-and-dt-call.html

http://onestitchatatimechallenge.blogspot.com/2011/06/challenge-67-things-with-wings.html


Sunday, 19 June 2011

Stamp'N'Doodle Male Themed Challenge

Hello my lovely followers, i know its been weeks since i have blogged, but after a surprise rush to hospital and 4 day stay 3wks ago, I've not been able to sit comfortably for long periods, so blogging and even crafting has been out of the question. I finally managed to make a card on Saturday for my hubby from the furbabies for fathers day, and yesterday i made my DT card for this weeks Stamp'n'Doodle challenge.

The challenge this week is to make a Male themed card with NO FLOWERS, male colours, male embellies, male colours etc. We were given the 'Fathers Love' image to play with, its s lovely image and real fun. I decided to work with the colours red, blue and olive green. i used 3 different textures of backing card and covered a square card with the olive green card, cut a oblong of handmade dark blue paper and layered it at an angle and used 2 thinner oblongs of red card top and bottom.
The image is coloured with pro markers and stuck on at an angle with foam pads. I added 3 different sizes of buttons in green, blue and red to the bottom corner and a fishing sentiment square in the top corner. i then used a piece of course string and let it wind around the image and stuck it down in places so it still has movement.

I hope that you will come along and join us in our Male Themed challenge here .

Kate xxx

I would like to enter this into these challenges:

 http://2sisterschallengeblog.blogspot.com/2011/06/challenge-44-for-guy.html

http://catchthebugblog.blogspot.com/2011/06/its-mans-world.html

http://littleclairesdesigns.blogspot.com/2011/06/challenge-9-cards-for-men.html

http://papercreatorscrafts.blogspot.com/2011/06/challenge-1-for-men.html

http://iftheshoefitsscrapit.blogspot.com/2011/06/ff83for-men.html

http://craftuscrazy.blogspot.com/2011/06/challenge-10sponsor-spotlightpink-gem.html

http://rainbowladyschallengeblog.blogspot.com/2011/06/challenge-157-i-am-sailing.html


[URL=http://s346.photobucket.com/user/skateds/media/D83D455045CAD933685876D59E5DD017.png.html][IMG]http://i346.photobucket.com/albums/p429/skateds/D83D455045CAD933685876D59E5DD017.png[/IMG][/URL]